When to retire content on your B2B SaaS website
Knowing when to retire content vs. producing new content can be a challenge. If you’re on the fence, use these tips to guide your website content...


Fadi George
In our modern era of digital media, content is key. Everyone knows, without it, your company will fall behind. What most people don’t realize is that without maintaining a consistent flow of fresh content, your company may be doomed to the same fate.
On one side, digital marketing has made it incredibly easy for companies to share new content, and now they’re fighting against each other to deliver a richer experience for their customers. On the other side, customers are becoming more accustomed to expecting new content – one that is published consistently and keeping with today's trends.
As you develop new content for your business, you must keep everything organized to make sure it’s relevant and useful. Here are 7 easy steps for creating your first content calendar to help you with content management.
Start by jotting down some ideas you’re passionate about. They don’t have to be completely ironed out to begin with, but it’s great to start thinking of topics you’d love to write. Don’t worry too much about relating it to your business at first, there are many ways it can be tied into later – and it is a great way to get your creative juices flowing.
Also think about the type of content you want to produce. Forget about whether it’s feasible for your business at your present stage, just put pen to paper – or in most cases, fingers to the keyboard. What you’re doing is building a bank of content that can be used somewhere down the line.
One piece of content that is often forgotten is utilizing customer testimonials and quotes. Feel free to check out this post for a free template to help get you to build your testimonial database.
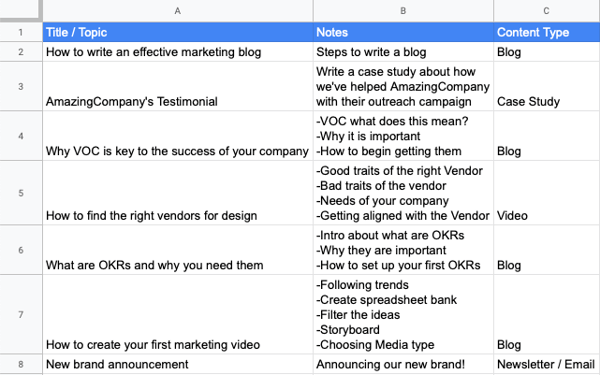
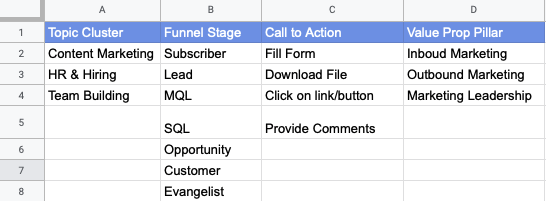
I find it best to organize everything into a content bank spreadsheet – it helps keeps everything nice and tidy. Some headers you can use to help you brainstorm could be:
Your content should be visible when customers search for your company, keywords or phrases – and ideally rank number one! It’s important to do an audit of your existing content, identify the content gaps for your sales funnel, and find the keywords that your competitors are ranking for. On top of that, you want to think about what search terms people in your ideal customer persona will search for. The search terms are vital and I would spend a lot of time thinking about this, as nailing down the right terms will make all the difference.
Use tools like SEMrush to help with the keyword research. To find out more about keyword research, check out this great blog post from HubSpot.
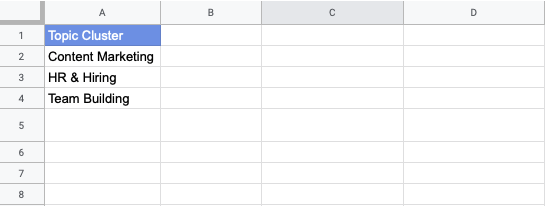
Once you’ve identified your keywords and topic clusters, put them on a new tab on the same spreadsheet discussed above. You can name this tab “Reference Table”, and the previous one “Content Bank”. Don’t worry about linking them to your topics yet, we just want to keep all the data in one place for now.
By now you’ve probably heard about the sales funnel stages of your customer journey. If not, check out this blog article about customer life cycle stages.
It’s also important to consider the relevant content for customers in each stage of the funnel, check out this post to see examples of content types and metrics for 6 stages of your funnel or this post about 4 campaigns that every growing SaaS should deploy.
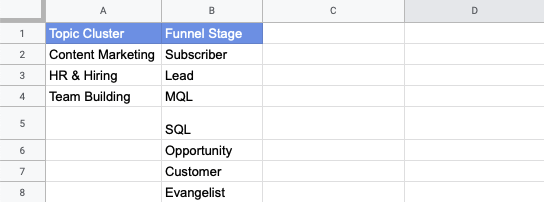
Just like before, put down on a new column your customer life cycle stage titles (maybe definitions as well to help keep the team aligned).
Every piece of content you publish should serve a purpose. Consider what the goals of your business look like, what gaps are present in moving customers through each stage of the funnel, and what calls to action will help drive them to the next stage. What are you looking to accomplish through your content?
If you have a little trouble with this, check out our blog post on 6 proven 'call to actions' for your landing pages.
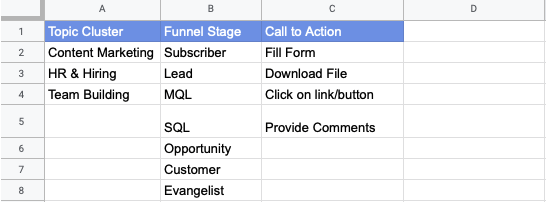
As you might have guessed by now, put that in a column on the spreadsheet as well!
Consider what your value proposition is to your customers. What are the pillars that you want to be known for in the market? This will help in creating the right messaging / content to reinforce your brand in the eyes of your customers.
If you haven’t developed messaging around your value proposition pillars, I suggest checking out this blog post on developing a framework for messaging – plus there’s a free template you can download!
And yes, you know it, put it on the spreadsheet!
 Step 6: Tie it all together
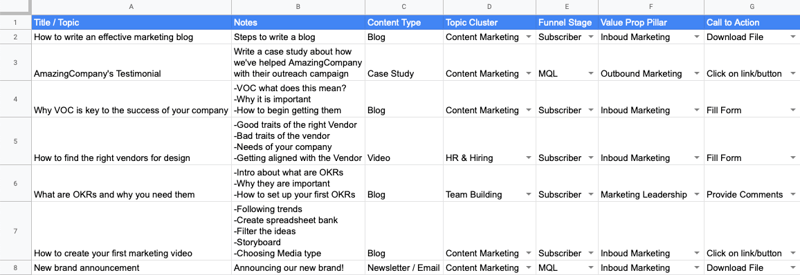
Here comes the fun part. At this point, you have all the appropriate headers to reference for your content calendar. Create a new tab in your spreadsheet and label it “Content Calendar” – this is where your master content calendar will live.
Start by adding all the headers of the other tabs you’ve been working on (Title, Notes, Content type, Topic cluster, Funnel stage, Call to action, Value prop pillar). If you use the data validation tool in Google Sheets, you can reference the other tabs, using a drop-down menu to make it easier for selection, without having to hop between tabs!
Next, consider what content you want to prioritize and why. The types of questions you should think about could include:
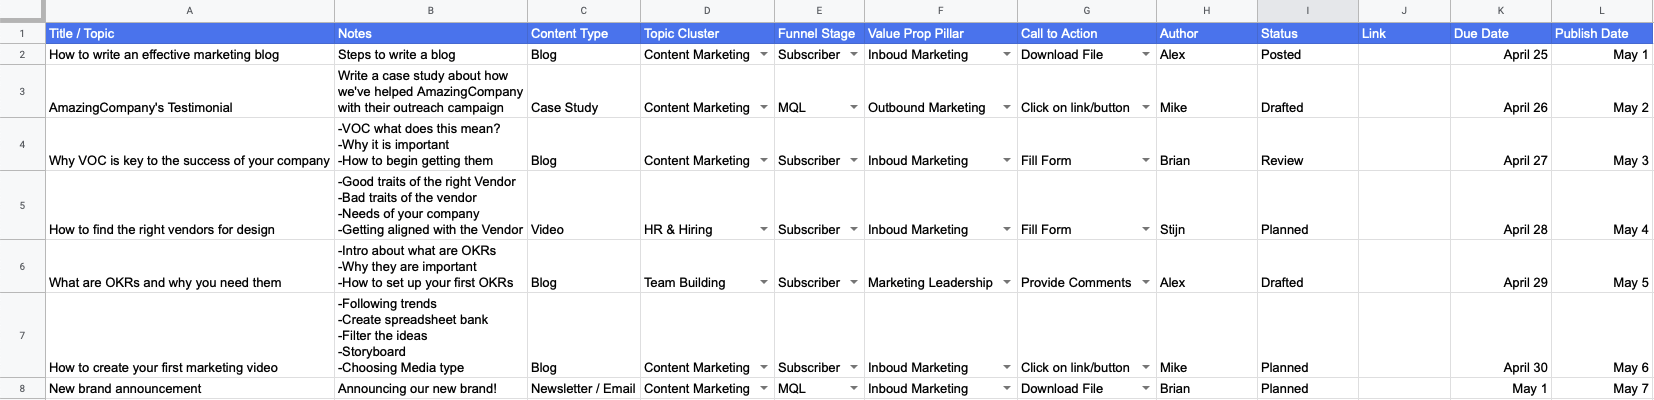
Prioritize the appropriate content and start laying it down. Additionally, some optional headers I usually add are:
 Step 7: Keep your content consistent and timely
It’s important to keep a steady flow of content – one that is predictable in timing, almost like a TV series.. Start separating due dates and publish dates on the final two headers. I find that keeping a due date of around 7-10 days before the actual publication date work best, as it allows an ample amount of time for revisions and planning.
And there you have it – your first marketing content calendar. To learn more about optimizing your content creation, check out our blog post about 5 components every piece of content should have.
If you’ve followed along to the very end, here is your reward – a free template! It will include everything I’ve discussed above to help get you on your way to your marketing content calendar.
.png?width=253&name=Content%20Calendar%20(1).png)

Knowing when to retire content vs. producing new content can be a challenge. If you’re on the fence, use these tips to guide your website content...
A content audit for SaaS doesn't have to be overwhelming. To drive meaningful results, keep a pulse on your content inventory, I'll show you how...

You realize that content is king, but where do you start? It's actually not hard to create genuine, unique, great content at scale, and do it fast.