One common mistake I have seen when looking into live and currently drafted web pages for their SaaS SEO strategy is that images are poorly optimized for website health and speed in general. We’ve all heard the quote “A picture is worth a thousand words.” Even though it is cliche, it is true and maybe worth even more.
Images grasp our attention and help us relate to what we’re seeing. They build a story and tend to make a much more lasting impression than just a large body of text. Many people love to get stock images from copyright-free stock photography sites like Unsplash.
.webp?width=700&height=437&name=Selecting%20unsplash%20images%201%20(1).webp)
Google highly prioritizes fast pages. By ignoring the necessary steps for image optimization, you’re setting yourself up for an uphill battle. The number of images added to a page directly affects load speed time. The more images a page has, the slower the load speed will become. In this guide, we will be visiting the 5 steps I go through when optimizing images for page speed and search engines.
Cropping and resizing your image
By default, the photo we downloaded is very large and high quality. Deciding how big or what resolution this image should be is determined by the largest size your image will be viewed. People think that they have the highest quality image to impress their customers or even themselves but they don’t realize this very negative impact. When deciding what size the image should be, think about the largest size that image will be viewed at.
You don’t need image dimensions to be 6000 x 6000 pixels if it is only going to be used for a small profile image or headshot that will be seen at 300 x 300 pixels. From my experience, I find that the largest image on the page will be the hero image at the top. A safe size to stay in while maintaining quality would be to make it the standard high definition size of 1920 x 1080 pixels.
Tips and tricks: If a banner image for a blog or webpage appears slightly lower quality than you would like it to be, consider applying a transparent overlay. This will make it appear like it is part of the design and make any text easier to read.
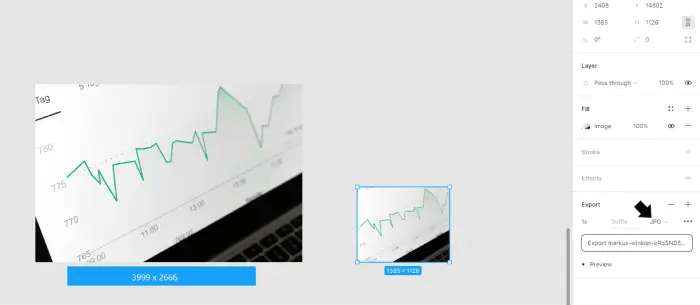
Below, I am using Figma to resize and crop my image. The process is very easy as all you have to do is drag and drop then change the image to your liking. Here are two controls you need to properly edit your image using Figma on windows.
- Shift + Drag - Will scale the entire image up or down while keeping the same ratio.
- Ctrl + Drag - Will change only the height or length without stretching the image.
Exporting as different file types
It’s important to think about what type of file format you will want to use. Many formats can serve different purposes. Each comes with its own set of pros and cons depending on the view of the user. Here are just a few of the most common ones I usually see:
- PNG - Good for graphic designs or images that you need to see the small details of This comes at the cost of a larger file size.
- JPEG - For real-life photography of people and locations. It can be compressed much more but lose a bit more information since you don’t need as much detail in these.
- SVG - Great for icons and logos as these can scale up and down without losing any quality. This can only work on created image files.
- WEBP - A newer version of images that can replace PNG and JPEG. WEBP has similar image quality to both while being able to save 25%-40% in space. The only downside is that currently, Apple’s Safari browser doesn’t support this so you would need backup JPEGs or PNGs to load.
- GIF - These are clips of videos or animations that tend to play in a loop. These are good for capturing a scene or showing off how a product’s interface can work. This article gives some good examples of how they can be used. Since they are an animated sequence of images they will usually be a heavier file size compared to one single image.
I enjoy using JPEG whenever I can since it requires the least data but here I am using PNGs to give a little more clarity on the screenshots. Like with WEBP, there might be even newer formats, so it is a best practice to continually research how Google views and ranks each one that is available to find the fastest and best answer for your webpage. Here is a link to a more in-depth guide on the most popular image types.
Use an image compressor
The next step would be to try to get the file you have as small as possible by compressing and reducing the file size. By going to an image compressor and processing the image, we can sometimes get our image to be up to 90% smaller in file size. A really useful tool I like to use is called Compressor. By using this tool you can compress up to 50 images a day on its free plan.
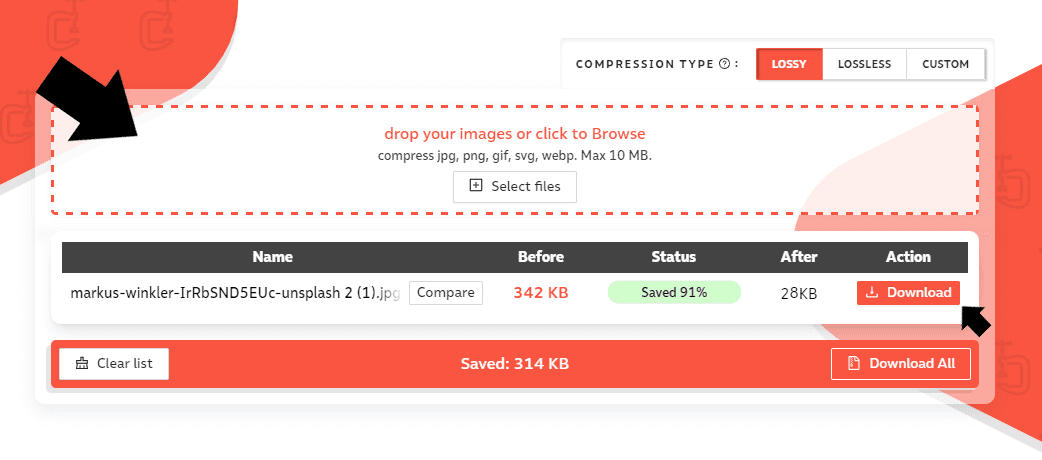
Here I am taking the image that I exported and I am dragging it right into the image drop section. After a couple of seconds, the new image is ready to download and around less than a tenth of the original size. You can also import multiple images and download them all at once as shown with the option at the bottom.
“Lazy” vs “Eager” loading your images
Now that you have your image in the correct format and compressed to the correct size, you may think that you’re all good to go but there are still a couple more things to make sure you do. In lots of templates and websites, image load speed is set to load by the browser’s default which can cause all your images on the page to load at the same time. The solution to this is to lazy load the image.
"Lazy" loading defers loading the element until it's visible on the page. When you have more than a couple of images this can improve site performance. The opposite of this is "Eager" loading which loads the element right away. This usually aligns with the default web setting since there is no preference set on which image should load first or last.
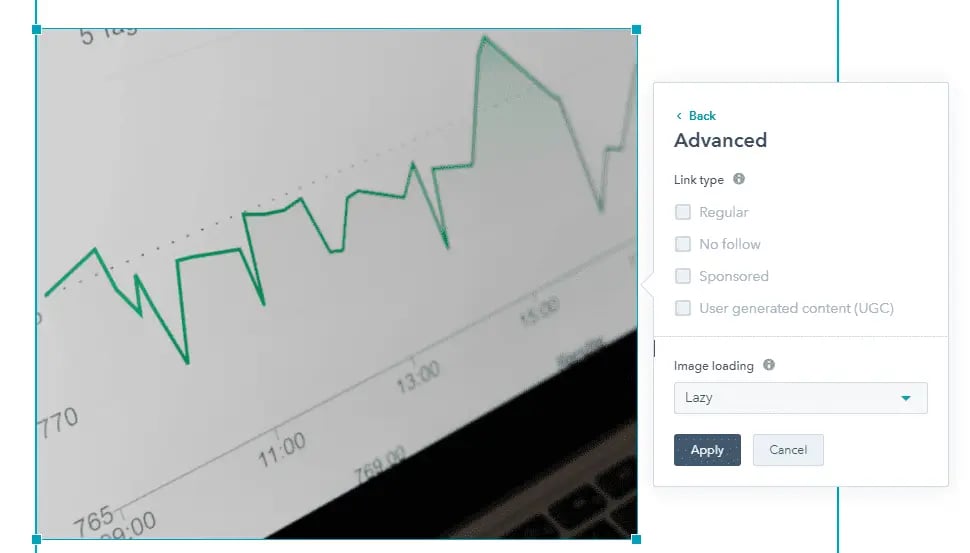
Here's an example in the HubSpot blog editor. After navigating to the advanced option for the inserted image, we can see that we can set its loading setting. Select “Lazy” and hit apply. The image now appears whenever the user scrolls much closer to it and shaves down those precious loading times.
Remember to add alt text
The last thing to visit is including Alt text in your images. This might not affect your page loading speed but is always important to consider and add. When you leave the section blank you’re missing out on many opportunities to increase your SERPs rankings.
An important thing to note is that Alt text is explaining the “why” of the image as it relates to the content. It is indexed by google and read aloud by text to speech for the visually impaired. If you’re just stuffing a single keyword into the image that doesn’t explain what is happening then that might not be the best approach.
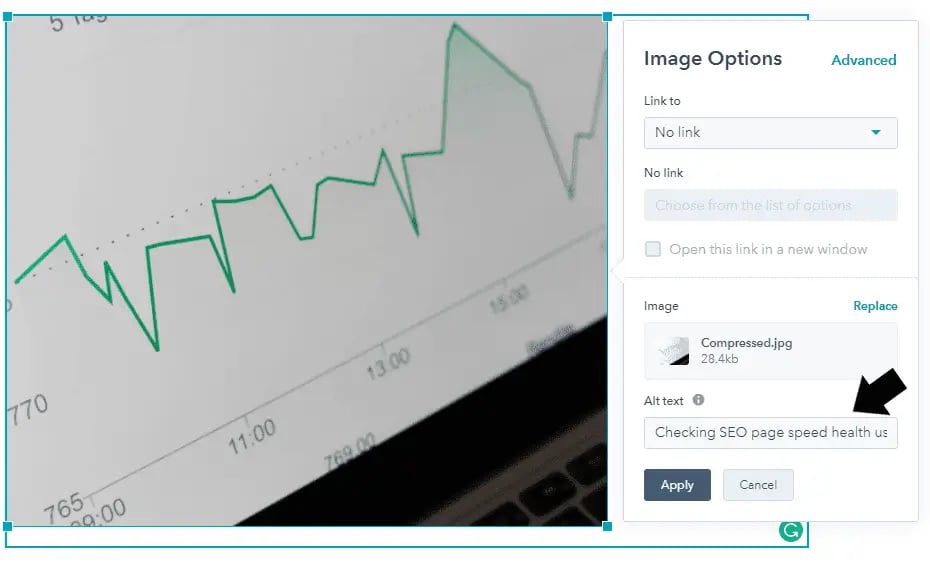
Here I have added the alt text into the image. I am basing it around the phrase SEO page speed health. Instead of only including the keyword, explain how or what the action is in the image as well. I decided to elaborate by using the phrase “Checking SEO page speed health using graphs”.
This is much more informative as to what the image could be about to Google indexing and grants greater accessibility to the visually impaired.
Let’s review the steps for creating/optimizing images:
- Drag the image into an image editor like Figma to crop and resize.
- Export it as the appropriate image type (PNG, JPEG, SVG, WEBP, etc.)
- Take it to an image compressor site like Compressor or Image Resizer Online
- Insert the compressed image into your content as lazy loading.
- Add alt text describing the images on your page.
- You now have the perfect image for your site!
- Check out Google Search Console to check your performance increases.
Follow these steps and you’ll be right on track to maintaining and optimizing your images for SEO and accelerating your page speed, creating a fantastic user experience!